
Livestream Guide
This page will serve as a guide to participating in an Ithaca Underground Livestream event. In order to perform on an IU Livestream, you need to either be able to stream your set live, or pre-record a video of your set that will be played during the livestream. This guide will have instruction for both options. If you intend to pre-record your set, you can skip everything that references Twitch.tv
The basic structure of the livestream is that you will stream directly to your own Twitch account, and IU will rebroadcast your stream. The intent is to have the main audience in the Ithaca Underground Twitch chat, so while your stream itself will not have any viewers, the content will be shown to everyone on the IU Twitch page.
If you have not already done so, please complete the IU Livestream Info Form
Requirements
You will need the following to perform on an IU Livestream.
- A computer (laptop or desktop)
- A webcam (built-in laptop webcam is fine)
- A method of getting your audio signal (instrument / mic) into the computer, such as a USB Audio Interface or USB Mixer
- An Internet connection capable of livestreaming
- A Twitch.tv account (not needed for pre-recorded sets)
If you are local to the Ithaca area and are in need of equipment, you can borrow equipment from IU at no cost, including laptops w/ webcams, USB mixers, microphones, and audio cables. Please discuss with your IU contact person well in advance of the show to coordinate borrowing equipment.
Stream & Software Setup
You will need a Twitch account in order stream your set. If you don't already have a Twitch account, you can follow these instructions to create a new one.
IU recommends using Open Broadcaster Software (OBS) to stream and record video. If you have experience with / prefer to use different software, you are welcome to, but IU will likely be unable to assist you with configuration or troubleshooting. This guide will focus on OBS for Windows, but the process should be largely similar for Mac OS X.
- Before configuring OBS, you should have your webcam and audio interface already connected to your computer.
- Download and install OBS from obsproject.com
- Run through the OBS software setup, leaving all settings at defaults unless you feel comfortable making customizations yourself.
- When prompted, connect your Twitch account
- In the Sources menu, click the + sign and select Video Capture Device
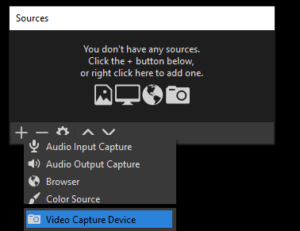
- Create a new source and name it something like "Webcam" then click OK
- Select your webcam from the Device dropdown. It should default to your webcam. You should be able to see yourself on screen now.
- From the Resolution/FPS Type dropdown, select Custom, and select the resolution that fits your computer screen. If you're not sure, try a few options until you get one that looks good and click OK
- You can also drag the red boxes around the sides of the webcam display window to resize it. Hold down the Alt key to crop it.
- Click on the + sign in the Sources menu again, and select Audio Capture Device
- Create a new source and name it appropriately (Mic, Mixer, etc) then click OK
- Select your audio source from the Device dropdown menu and click OK
- Make sure your audio source is working by sending some signal (voice or instrument) through it and confirm that you see it being received in the OBS Audio Mixer

- Make sure your audio source is working by sending some signal (voice or instrument) through it and confirm that you see it being received in the OBS Audio Mixer
- Repeat for each additional audio source you will be using
Preparation and Testing
After configuring OBS, you'll want to do some tests to make sure it is working properly. If you encounter issues during testing, please reach out to your IU contact person for help troubleshooting.
If you are not intending to perform your set live, and will be pre-recording it, you will only need to use the Recording feature of OBS, and can skip the Twitch Stream component.
Initial Testing
- Under the Controls menu on the bottom-right of OBS, click Start Recording and perform some of your set. Click Stop Recording when finished,
- Review the footage, which is stored in the Videos folder of your user profile by default.
- Make sure that the lighting and audio levels are both good.
Twitch Stream Testing
- While logged into Twitch, open your Creator Dashboard
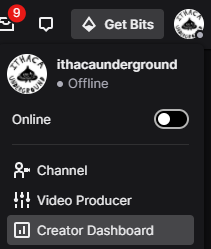
- On the left-hand menu, go to Settings -> Stream and enable Store past broadcasts
- Back in OBS, click Start Streaming and perform some of your set. Click Stop Streaming when finished.
- Review the footage, which can be found in your Twitch channel Videos page, example: https://www.twitch.tv/ithacaunderground/videos
- Make sure that the audio and visuals are both good and consistent.
Streaming / Recording Tips
- Louder is better - the IU stream tech can always turn your audio levels down, but it's harder to turn your levels up if your signal is too quiet
- Make sure your performance area is well lit - webcams work best in bright light, so try to have a lamp pointed at your direction
Day of Show
You will be expected to be available and responsive to text / social media messages immediately before and during the livestream.
You will be provided your designated set time in advance. It is recommended that you watch the stream before your scheduled start time so you can see when the performer before you finishes, and start getting ready.
You should be ready to start your stream 10 minutes before you are scheduled to go on. You will likely be asked to start your stream a few minutes before your scheduled start time to make sure there are no issues when the main IU stream starts rebroadcasting your stream.
The person running tech for the stream will give you a warning a few minutes before you are live on the main channel, and again 30 seconds before you are live.
When you are finished with your set, say something to that effect, or establish a signal with the IU stream tech so they know when to cut away from your stream.
At this point, you have finished your stream! You can stop your stream and close OBS.
The video of the show will be available on Twitch for a couple weeks, and will also be uploaded to YouTube by IU. If you want a copy of your set for yourself, you should click Start Recording as well as Start Streaming when you begin your livestream set.